Back in Blighty

Moderators:Popsjag, J44EAG

jonjeffryes
Posts:206
Joined:Wed Oct 29, 2014 7:34 pm
Back in Blighty

Postby jonjeffryes » Tue Jul 05, 2016 10:48 pm

Now here's a surprise. Arrived back in England last night after covering c. 2500 miles over the past week; some cruising in excess of 240 kmh on the autobahn, lots of climbing and descending mountain passes and the majority at elevations higher than our base hotel (which itself was 1100m above sea level).

The week had been fantastic and not just because the sun shone for 90% of the time. Some of the best driving roads and most beautiful scenery, which looks even better from the interior of a wonderfully air condition X350.

However, I had issues with the air suspension and with lean running on both banks throwing up codes. Strangely on the return to lower altitude...all the issues have disappeared!!

Suspension is back to it's usual...no running codes, full power and all good.. It took my wife to work out that it is all down to air density - at a base altitude of about 3500 feet - a working but worn suspension air pump struggled...equally, the lower air density seemingly tipped the emissions over the balance.

I am still going ahead with rebuilding the air pump and changing the vacuum pipes in the vee (plus the valley water pipe for good measure) and changing the knock sensors whilst I have the supercharger off...but the car seems to have fixed itself......now if only I can get the Porsche to do the same...I'll be quids in :-)

User avatar
J44EAG

Moderator
Posts:6239
Joined:Sat Oct 20, 2007 9:57 pm
Location:Warlingham Surrey/Faversham Kent

Re: Back in Blighty

Postby J44EAG » Wed Jul 06, 2016 5:40 pm

A few ideas, Jon.

The suspension compressor has an air filter on it. I wonder if that has become blocked? Combined with a worn piston ring and high altitude, it strikes me that all three issues when combined could cause the troubles.

Once again I have the lean bank A&B P0171 and P0174 issues. You will remember I had to cut an inch off the "pesky pipe" from the cowhorn charger output pipe due to rubber rot. I now consider that the pipe has degraded further perhaps at the actuator end or somewhere in between. The pipe is 1/8"/3.3mm ID and is 28" in length. The Jaguar OE part number is AJ83877 which cost me £7.27 with JEC discount at Harwoods in Chichester yesterday. A similar pipe can also be found at Halfords for around £3. This pipe is well worth replacing as in poor condition it causes massive air leaks sufficient to generate MIL and Check lights.
20160705_122246.jpg
When you drag the charger off, perhaps you could post the part number for the V-pipe which is also well known as a rotter!

Whilst you have the bumper cover off to work on the compressor, you might also consider replacing the Hella super charger coolant pump. These are £173 from Jaguar or an up-rated Bosch unit from AVT via ebay comes at a more reasonable £135. This is what the drag racers use and it is known to be a fine piece of kit. The Hella pump is known to become unreliable from around 130k miles.
Bosch XJR supercharger intercooler pump. 001.jpg
If you have the charger off the car, then I would also suggest you replace the drive shock coupling which can fail or become noisy. Lawson Smith at Powerhouse Engineering markets an uprated oil filled replacement for around £26. He can also supply new rear bearings, special grease and genuine oil for these chargers.
20160308_160440 (Small).jpg
With the charger off the car, a few minutes work with a die grinder is well worth the effort. I cleared the cowhorn by-pass neck of restrictive aluminium and the car became much easier to drive at low throttle. A bit of fettling within the cowhorn for ten minutes is also worth the effort.
20160216_171012 (Small).jpg
You might also clear the throttle body elbow of excess metal if you have a die grinder to hand. It is chock a block with material that serves only to restrict performance. I have images available for anyone wishing to tackle this type of basic gas flowing. It is great fun to do as results come in tons!..........You could also port the charger as indeed I am about to do once I have some free time......

Don`t forget to clean up the parking sensors and other electrical grounds or plugs whilst you have good access. ARB bush access is also good when the bumper cover is off. The throttle body and charger elbow will also be filthy with crankcase breather residue and will need a good clean up.

Enjoy yourself!

Mike
X350 Co-ordinator

2004 XJR

jonjeffryes
Posts:206
Joined:Wed Oct 29, 2014 7:34 pm

Re: Back in Blighty

Postby jonjeffryes » Wed Jul 06, 2016 6:49 pm

Stop right now Mike :shock: that one post has turned my quick couple of hours on a Sunday afternoon to a full Formula 1 pit stop :wink:

If you can publish the photo's of the throttle body, that would be useful. I'm also planning on changing the knock sensors (as I will have unrestricted access) whilst I have it all apart....and the valley pipe.

Is the air pump filter a replacement or a clean up jobby? I will get the parts from work as I get a really good price.

The front disc judder is back so one disc will be replaced under warranty...whilst that is apart I will overhaul the calipers..... I saw Mike Brewer do this job on Wheeler Dealers last night - it only took him a few minutes and he ended up with brand new calipers...I must have a go at that :lol:

Looks like I had better start ordering parts then Mike....before the threatened summer ends and we get some decent weather to enjoy the car :|

User avatar
J44EAG

Moderator
Posts:6239
Joined:Sat Oct 20, 2007 9:57 pm
Location:Warlingham Surrey/Faversham Kent

Re: Back in Blighty

Postby J44EAG » Thu Jul 07, 2016 12:00 am

I believe the compressor filter is a moderately cleanable one. That said, they do fall off, the air becomes unfiltered and piston ring wear accelerates! Might be worth getting a new one at the same time as the other parts. Do check for general air leaks at the pump, the top of the airbag units and at the tank and valve block unit in the boot.

My pal Dave Rex whom you met recently, advises pushing the caliper pistons out slightly when the pads are out. As we found on mine, a layer of salt type encrustation behind the dust seals stops the pistons retracting fully and it needs to be removed. We used a feeler guage to dislodge the crud and cleaned up with a tooth brush and some brake fluid. Then wiped off with a lint free cloth...in this case and old pair of someones jocks!

Getting the charger off will I am sure be a nause. There is little space around the TB. That third nut or bolt at the rear of the charger is obscured by the throttle body/charger rear elbow and they both have to come off together with the by-pass actuator and separation of the EGR valve pipe and bolts which are usually corroded. There are also a couple of sheet metal brackets to remove. The EGR valve has shim type crush gaskets so you need to order those before you strip down. You will also need a new TB gasket. The top, front and rear steel, rubber coated SC gaskets will probably be reusable. Loctite SI5980 from Halfords is used on mating gasket surfaces and is the equivalent of OE sealer in these locations.

I suspect your car will be down for around three or four days of stationary activity. My gut out and rebuild will be of similar time duration plus time allocation for installation of a massive inter-cooler heat exchanger..

My next article in the magazine will be of interest to many S/C Jaguar owners. This describes the "Nineteen day glitch" which I experienced over Christmas last. Lean bank A&B and P)171 and P0174 is explored in some detail as is the "Pesky Pipe" failure. Essentially what we are discussing here will be copy for the next August 2016 X350 forum pages. Thats a secret!

Mike
X350 Co-ordinator

2004 XJR

User avatar
J44EAG

Moderator
Posts:6239
Joined:Sat Oct 20, 2007 9:57 pm
Location:Warlingham Surrey/Faversham Kent

Re: Back in Blighty

Postby J44EAG » Fri Jul 08, 2016 4:30 am

Jon.

This ebay link shows a throttle body complete with elbow which is bolted to the rear end of the supercharger.
http://www.ebay.co.uk/itm/JAGUAR-S-TYPE ... Sw7KJXDwfO

Four bolts secure the throttle to the elbow. A gasket is sandwiched between the two parts.

The large stepper drive motor for the throttle plate is visable as is the small throttle plate position feed back pot unit which tells the engine management ECU the angular position of the throttle plate.

Also visable is theby-pass actuator and the "Pesky Pipe" with small rubber elbow which links to the output cowhorn on the pressure side of the supercharger. The link rod can be seen and a second similar rubber pipe which I assume links with a fuel pressure regulator. Any defects in that rubber pipe which cause pressure leaks will cause the famed P) codes and check light and MIL lamp issues to occur.
On the elbow, the smaller throttle by-pass plate is also to be seen.

Both throttle plates on this particular example together with their throats are filthy with crankcase breather residue. This needs removal with carb cleaner to spotless condition. Idle speed and lumpy running can become affected if these plates and throats become severely covered in gunk.

Note also the charger end of the elbow and the gasket high tide marks. The rubber covered steel sheet gasket sandwiches between the elbow and the charger. The top cowhorn output plenum gasket and the front snout gasket are of the same construction and if in good condition can be re-used. Bead seal on both sides of these gasket with the Loctite sealer as detailed earlier.

There is considerable scope for gas flowing the elbow and inner part of the charger casing. The lower floor of the casing and the elbow can easily be lowered by around 6mm to assist with faster air flow through the charger.

I have a cheap second hand elbow arriving shortly which will be gas flowed and at some point fitted to my car when time allows. I`ll post images here once I make a start on the unit.

Hope that helps.

Mike
X350 Co-ordinator

2004 XJR

User avatar
J44EAG

Moderator
Posts:6239
Joined:Sat Oct 20, 2007 9:57 pm
Location:Warlingham Surrey/Faversham Kent

Re: Back in Blighty

Postby J44EAG » Fri Jul 08, 2016 10:19 pm

The second hand elbow arrived today in sound but very dirty condition. However, whoever removed the part cut through a small pipe with snips and ruined the pipe. The remains were difficult to remove which will require me to attempt to salvage the pipe from the elbow presently in service on my car and fit it to this elbow once I have carried out gas flowing modifications..

These next images are posted to help Jon when he removes the elbow on his car for parts replacement around the supercharger and general area. Similar images will be posted on a thread I have running and will eventually show the process of charger removal and modification.

This shot looking downwards depicts the elbow and shows the large throttle body mount secured with four Torx bolts. A gasket sits between the body and the elbow. To the left is the smaller by-pass outlet upon which a mounting plate sits complete with a throttle plate and a pressure driven actuator and drive rod link to that throttle plate. I expect to find a gasket between the two parts. A small vac type 1/8 ID inch stub pipe with a rubber pipe is to the centre bottom of the image. The pipe on this elbow was not unexpectedly a loose fit on the stub pipe and will need replacement. The Manifold Air Pressure sensor was to the bottom right ( removed for cleaning) and fits to the elbow with two Torx bolts and a sealing o-ring. The sensor nose pokes through into the elbow directly under the throttle body throttle plate and senses air pressure (negative) below the throttle plate. Several large air pipe stubs also exit the elbow.
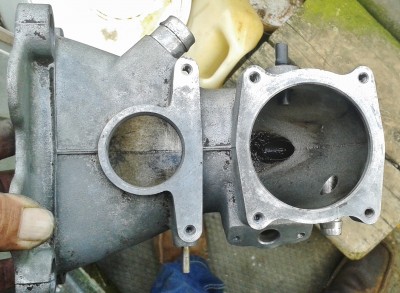
20160708_185117.jpg
This shot shows the elbow mating face to the back inlet end of the charger. A metal rubber coated gasket sits between the two castings.
20160708_171110.jpg
This internal detail shot shows the huge mass of congealed heat baked crank case breather oil residue which collects in the elbow. It is as hard as road tar and difficult to be move because of its solidity. It can be brokenen up with a screw driver and then softened with thinners. It is a very sticky substance indeed and far harder to remove than you would first imagine. I used acetone and a short length of soft copper 8mm pipe as a chisel to remove this obnoxious mass from the floor of the elbow.
20160708_171846.jpg
To the rear of the elbow is the EGR valve pipe which feeds into the throttle body. A shim metal crush gasket sits between the pipe flange and the throttle body. I believe two 10mm hex bolts secure the three parts together, The throttle body removal affords access to those bolts. Access is tight. At the base of the elbow is a horizontal threaded lug to which I believe a metal steady plate for the elbow is mounted. Again, expect difficult access.
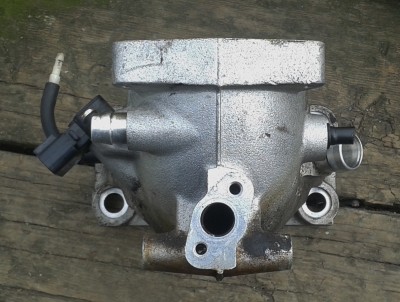
20160708_171812.jpg
After detergent cleaning, I further subjected this elbow to a dilute hydro-chloric acid and paint brush cleaning session. I hate working with dirty parts and I attempt to remove as much grot as I can before reworking or modifying any parts. This image shows the outlet end of the elbow with a modified gasket laid over the elbow face. The mods were suggested by Powerhouse Automotive who are experts at supercharger modification. Of note is the 6mm lowered bottom floor face of the modified gasket. The bare metal of the elbow showing within the gasket will be machined away with a die grinder, thus significantly opening up the air flow tunnel within the front face of the elbow. Further matching machining of the supercharger case will be carried out to port match to the elbow. In addition further metal removal and gas flowing will also take place and will also clear further outlet areas of unwanted metal.
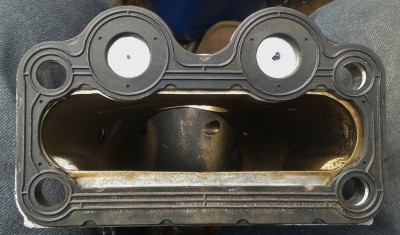
20160708_171014.jpg
This image shows the gasket atop the elbow on which the throttle body is mounted. Once again a significant restriction is noted within the internal circumference of the gasket. Approximately 2-3mm of excess metal obstructs the passage of air directly under the throttle which saps the engine of torque and power.. The lip will be removed as per the Powerhouse recommendation.
20160708_170940.jpg
Further gas flowing will be carried out inside the elbow which is roughly finished from the factory and can stand a fair amount of smoothing and de-constriction.

My hope is to begin modifying this used elbow tomorrow then setting it aside until I have the time to remove the complete charger for similar gas flowing and re-porting. Getting this second hand elbow for just a few pounds will help me keep car down time to a minimum and reduce the amount of work at the time due to having already carried out modification to the elbow.

Jon`s overhaul of the charger will no doubt require similar work to my own car but probably less the extra gas flowing that i`ve decided to undertake.

More on this job as I progress.

Mike
X350 Co-ordinator

2004 XJR

User avatar
J44EAG

Moderator
Posts:6239
Joined:Sat Oct 20, 2007 9:57 pm
Location:Warlingham Surrey/Faversham Kent

Re: Back in Blighty

Postby J44EAG » Sat Jul 09, 2016 5:14 pm

A couple of hours work with the die grinder produced these results. Use of ear defenders mandatory due to noise of compressor and air grinder exhaust.

This shot shows the stock elbow with a new gasket. Note the 3mm excess of metal arroung the periphery of the throat.
20160708_170940.jpg
The dark red ink shows the amount of material to be removed.
20160709_125534.jpg
The reworked throat with metal removed.
20160709_161706.jpg
Ink used again to mark out metal to be removed as seen here on the output flange of the elbow.
20160709_125601.jpg
The output flange after machining.
20160709_161733.jpg
An enjoyable couple of hours opening out this elbow. Very satisfying.
20160709_161843.jpg
Iinternals sanded with mini garnet rolls on a barrel mandrel. A fanatic would sand further and then polish to perfection. As this job stands, the finish is now rather better than the OE factory cast finish. That is good enough for me. Airflow within this part should be nicely improved.

This elbow now awaits the removal of the supercharger on my car and another port matching session which will match the charger case to this re-worked elbow.

Detail shot of the inside of the elbow with EGR inlet in the centre of the picture. All crank case residue removed.
20160709_161738.jpg
The modified "low floor" gasket placed on the flange. Approximately 6mm of metal height removed. and the elbow floor machined back to allow a fuller airflow.
20160709_161843.jpg
Mike
X350 Co-ordinator

2004 XJR

User avatar
J44EAG

Moderator
Posts:6239
Joined:Sat Oct 20, 2007 9:57 pm
Location:Warlingham Surrey/Faversham Kent

Re: Back in Blighty

Postby J44EAG » Sun Jul 10, 2016 7:27 pm

I managed to find some small polishing mobs and compound. The compound came from ebay and wasn`t expensive. The cutting paste is quite abrasive and comes as a stick similar to a thin Mars bar. It does look quite yummie!

The polishing compound is for the finishing rub up and is far less aggressive. Blue in colour and doesn`t look so edible! The makers say to use a different mops for each application.

Polishing shows up all the defects. There are some rough spots in my work which really could have done with more Garnet sanding but this elbow is aan exceedingly difficult unit to work. It is long and quite thin. Regretably the windy grinder is quite short and fat. The cutting and polishing mandrels could have been a bit longer. That would have helped. Suffice to say I`ve found a long thin windy grinder on ebay but it will take three weeks to arrive. Also seen on ebay are electric powered long nose grinders to get into long, restricted passages. So a total of about 4 hours spent getting to this stage. I`d suggest I couldn`t have reworked a more difficult object as my first try at extensive porting. Its not difficult, just a bit time consuming and noisy. I see in the mirror I have a black face. Hands are the same. The compound is messy to use.

The finish within the elbow is now better than last night. By no means perfect but the majority of the internal surface area has a nice polished finish which is better than when it left the Eaton factory.
20160710_185455.jpg
20160710_185518.jpg
20160710_185541.jpg
That is as much as I`m going to do on this elbow. More interesting stuff to do on the charger once it is off the car. Takes a bit of effort to tear a fully functional car apart when it doesn`t need it. All in persuit of interest, a hobby and raw horse power. If it can be done, then I have to do it. May be I need to see a shrink. Is there anyone here who could give me an assessment? please don`t suggest Mr J. I need an intact wallet.

Mike
X350 Co-ordinator

2004 XJR

jonjeffryes
Posts:206
Joined:Wed Oct 29, 2014 7:34 pm

Re: Back in Blighty

Postby jonjeffryes » Sun Jul 10, 2016 8:57 pm

Fantastic work Mike...I am really impressed by your diligence and bravery, sawing chunks off a perfectly serviceable engine.

I have ignored my issues as they appear to have gone away with the more sensible altitude in Crawley...35mtrs above sea level seems to suit the old girl somewhat better than 1200+! However I did go as far as removing the corpse's of 1000's of European bugs collected on the return journey and treating the old girl to a full valet.

I've also been approached by two neighbours, both who have stated an interest in my car .....I did have to point out quite firmly that it isn't for sale now....or any time in the near future :D

I'm in work tomorrow so will be ordering the knock sensors and valley pipe plus a set of appropriate gaskets ready to take the supercharger off and deal with whatever I find

User avatar
J44EAG

Moderator
Posts:6239
Joined:Sat Oct 20, 2007 9:57 pm
Location:Warlingham Surrey/Faversham Kent

Re: Back in Blighty

Postby J44EAG » Sun Jul 10, 2016 9:51 pm

Don`t for get to get the Pesky Pipe and several that appear made from the same tube type. All the old ones I`ve come across seem to expand and fall off the stub pipes. Thats what gives us all the P0171 and P0174 lean codes.

Perhaps you could let me have a list of part numbers for all the parts you buy. That would be useful to myself and others.

I`ve still got a black face. The polishing stuff won`t come off!

Mike
X350 Co-ordinator

2004 XJR

jonjeffryes
Posts:206
Joined:Wed Oct 29, 2014 7:34 pm

Re: Back in Blighty

Postby jonjeffryes » Sun Jul 10, 2016 11:34 pm

...ha ha Mike....are you sure your face is black or just polished up with a chrome finish :lol:

I'll work my way through the part numbers and publish with photo's as soon as I have a chance to get my hands on her...however the Porsche is being petulant so I have to focus on that first as I cannot have both cars disabled.

It's running, driving, steering, riding and stopping perfectly.....but unusually for a German...electrics are playing up. At least the system is more basic than the Jaguar :roll:

User avatar
J44EAG

Moderator
Posts:6239
Joined:Sat Oct 20, 2007 9:57 pm
Location:Warlingham Surrey/Faversham Kent

Re: Back in Blighty

Postby J44EAG » Mon Jul 11, 2016 8:42 am

Worth getting a new charger up-rated anti-shock/drive coupling from Lawson Smith at Powerhouse, It costs around £26,Jon. The OE unit can break up after high mileage. Half a dozen bolts on the front end of the charger allows the snout unit to pull off and the coupling to be changed. The steel/rubber gasket should do further service. Clean and run a bead of Loctite SI5980 on the mating surfaces. The same with the cow-horn and elbow gaskets. This will prevent fluid and air leaks. Lawson also sells a little file of special synthetic rear rotor bearing grease. No bad thing to repack to rear caged needle roller bearings. Change them for new parts of showing signs of wear. About £80 for the pair. Not cheap but made to the highest standards.

At full chat, the charger outlet air temperature can rocket from ambient air temperature to around 160 degrees in a few seconds. The effects of this elevated temperature is obviously highly destructive over a period of time. It is well worth going in quite deep at overhaul stage and re-lifeing as many aged components as possible. The Pesky Pipe and its brothers really suffer badly as does the valley pipe which gets cooked to extinction.

Mike
X350 Co-ordinator

2004 XJR

jonjeffryes
Posts:206
Joined:Wed Oct 29, 2014 7:34 pm

Re: Back in Blighty

Postby jonjeffryes » Mon Jul 11, 2016 10:32 pm

It's out with the credit card time then Mike.

The car is a keeper and very much proved it's credentials on the European trip. Kim and I agree it is probably the best car we have ever owned (and we've had over 50 with a fair number of new cars and premium brands) so I am not concerned about spending whatever is required.

I'll arrange the parts this week.....plus I plan to upgrade the battery to the best I can find as the new battery fitted a couple of months ago still seems a little under-powered.

I've lodged my claim with Pagid who will replace the recently fitted discs which have warped after the high speed autobahn use. Hopefully the new set should survive the standard UK speed limits for a little longer than the first set!

I'll call you back as soon as the world of work stops spinning :D

User avatar
J44EAG

Moderator
Posts:6239
Joined:Sat Oct 20, 2007 9:57 pm
Location:Warlingham Surrey/Faversham Kent

Re: Back in Blighty

Postby J44EAG » Mon Jul 11, 2016 11:25 pm

The more we drive these cars, the more they get under our skin. Then comes a problem. If you consider with what to replace an X350 (of any of the model range) should the option be available, the question becomes very, very difficult to solve. CLK55, Bentley, a big Audi or Beamer?. The CLK or a Bentley would be just about be my the only possible alternative choice. Even then it would be a very reluctant change.

Even when elderly or with highish miles, these cars represent the finest value for money around in my opinion. Yes, they give us a bit of grief now and again but we do manage to fix them ourselves with usually only a moderate level of cost or difficulty. Essentially although these cars were primarily built to be high level garage maintained, we manage well doing much of the work ourselves. Its quite remarkable really. Even modifications to these and the sister cars ie S-type and XF are not totally beyond possibility given a bucket of spanners, a die grinder and a bench press!

The 350R always wows anyone who drives the model. Its pretty good from Coventry in its natural state. Add a couple of thousand pounds worth of tweeky bits and the model becomes a total revelation. Bang for the buck, it scores in so many areas that other makes and models can only envy.

Clarkson said "No car on this earth does everything so well an an XJR. Those that have a good one would i think totally agree. No change of car for me either then. Mine is also a "keeper". Yip, Jaguar certainly got this one as right as a car could ever be as an out of the box product. They left enough meat on the bone for the likes of me and my modification obsession. Without doubt the R is the finest and most refined car I`ve yet owned. Just try taking it away! No way!! Not negotiable!!!

Mike
X350 Co-ordinator

2004 XJR

jonjeffryes
Posts:206
Joined:Wed Oct 29, 2014 7:34 pm

Re: Back in Blighty

Postby jonjeffryes » Tue Jul 12, 2016 7:36 pm

We are as one on this Mike :D


Who is online

Users browsing this forum: No registered users and 2 guests